“라이믹스 설치”를 LEMP 스택으로 하는 것은 웹사이트 성능을 높이는 데 매우 중요합니다. LEMP는 Linux, Nginx, MariaDB, PHP로 구성된 환경으로, 각각의 요소가 유기적으로 결합되어 효율적인 웹 서버 환경을 제공합니다. 라이믹스는 PHP로 구동되는 CMS로, PHP 8.0 이상의 버전에서 설치하면 성능이 더 좋아진다고 알려져 있지만, 일부 모듈을 사용하려면 여전히 PHP 7.4 버전을 설치해야 하는 경우가 있습니다. 이 라이믹스 설치 매뉴얼(가이드)에서는 Ubuntu 22.04에서 PHP 7.4를 활용해 LEMP 스택을 설정하고 라이믹스를 설치하는 방법을 소개합니다. Lightsail 7달러 플랜의 서버를 기준으로 Nginx, MariaDB, PHP를 간단하고 효율적으로 설정하는 과정을 단계별로 설명하여, 복잡한 과정 없이 이 설정 그대로 설치 가능하도록 최적의 가이드를 작성합니다.
라이믹스 설치 환경
서버: Lightsail 7달러 플랜
OS: Ubuntu 22.04
PHP: 7.4.33
NGINX: 1.18.0
mariadb: 10.6.18
#ubuntu 버전 확인
lsb_release -a

#php 버전 확인
php -v

#nginx 버전 확인
nginx -v

#mariadb 버전 확인
mysql --version
타임존 아시아로 설정
sudo timedatectl set-timezone Asia/Seoulnginx 설치
sudo apt-get update
sudo apt-get upgrade
sudo apt-get install nginx
nginx -v

service nginx status
sudo service nginx restart
#아파치 실행되고 있으면 종
sudo systemctl unmask nginx.service
sudo /etc/init.d/apache2 stopphp7.4 설치
sudo apt-get update
sudo apt -y install software-properties-common
sudo add-apt-repository ppa:ondrej/php
sudo apt-get update
sudo apt install -y php7.4-fpm php7.4-cli php7.4-bcmath php7.4-bz2 php7.4-dev php7.4-common php7.4-json php7.4-opcache php7.4-readline php7.4-mbstring php7.4-curl php7.4-gd php7.4-mysql php7.4-mysqlnd php7.4-gmp php7.4-imagick php7.4-zip php7.4-intl php7.4-xml php7.4-xmlrpc php7.4-dba php7.4-soap php7.4-ctype php7.4-pdo php7.4-redis php7.4-geoip php7.4-simplexml php7.4-exif php7.4-fileinfo php-pear php-fpm git-core

service php7.4-fpm status

sudo systemctl enable php7.4-fpm
sudo systemctl start php7.4-fpm
nginx 설치 후 설정
cd /etc/nginx/sites-available/
sudo vi default
server {
  listen 80 ;
  listen [::]:80 ;

  root /var/www/html;
  index index.php index.html index.htm index.nginx-debian.html;
  server_name _;
  access_log /var/log/nginx/web.access.log;
  error_log /var/log/nginx/web.error.log;

  location / {
    try_files $uri $uri/ /index.php?$args;
  }
  error_page 404 /404.html;
  error_page 500 502 503 504 /50x.html;
  location = /50x.html {
    root /var/www/html;
  }
  location ~ \.php$ {
    try_files $uri =404;
    fastcgi_cache off;
    fastcgi_split_path_info ^(.+\.php)(.*)$;
    fastcgi_index index.php;
    include fastcgi_params;
    fastcgi_param SCRIPT_FILENAME $document_root$fastcgi_script_name;
    fastcgi_pass unix:/var/run/php/php7.4-fpm.sock;
    include mime.types;
  }
  location ~ /\.ht {
    deny all;
  }
}
sudo service nginx restart
마리아디비 설치
sudo apt install mariadb-server
service mysql status
ssl 설치
sudo apt install certbot python3-certbot-nginxsudo vi default
server_name example.com www.example.com;추가 후 저장
sudo certbot --nginx -d example.com -d www.example.com디비 생성
sudo mysql_secure_installation #Y N Y Y Y Y
sudo mysql -u root -p
DB 생성
CREATE DATABASE db_rhy;
CREATE USER user_rhy@localhost;
SET PASSWORD FOR user_rhy@localhost=PASSWORD("password");
GRANT ALL PRIVILEGES ON db_rhy.* TO user_rhy@localhost IDENTIFIED BY 'password';
FLUSH PRIVILEGES;
exit
라이믹스 설치
cd /var/www/html

sudo git clone https://github.com/rhymix/rhymix.git
sudo mv ./rhymix/* ./
sudo rm -rf ./rhymix
sudo rm -rf index.nginx-debian.html

sudo mkdir files
sudo chmod 777 files
짧은 주소 설정
cd /etc/nginx/snippets

sudo vi rhymix.conf
# block direct access to templates, XML schemas, config files, dotfiles, environment info, etc.
location ~ ^/modules/editor/(skins|styles)/.+\.html$ {
# pass
}
location ~ ^/(addons|common/tpl|files/ruleset|(m\.)?layouts|modules|plugins|themes|widgets|widgetstyles)/.+\.(html|xml)$ {
return 403;
}
location ~ ^/files/(attach|config|cache/store)/.+\.(ph(p|t|ar)?[0-9]?|p?html?|cgi|pl|exe|[aj]spx?|inc|bak)$ {
return 403;
}
location ~ ^/files/(env|member_extra_info/(new_message_flags|point))/ {
return 403;
}
location ~ ^/(\.git|\.ht|\.travis|codeception\.|composer\.|Gruntfile\.js|package\.json|CONTRIBUTING|COPYRIGHT|LICENSE|README) {
return 403;
}
# fix incorrect relative URLs (for legacy support)
location ~ ^/(.+)/(addons|files|layouts|m\.layouts|modules|widgets|widgetstyles)/(.+) {
try_files $uri $uri/ /$2/$3;
}
# fix incorrect minified URLs (for legacy support)
location ~ ^/(.+)\.min\.(css|js)$ {
try_files $uri $uri/ /$1.$2;
}
# fix download URL when other directives for static files are present
location ~ ^/files/download/ {
try_files $uri $uri/ /index.php$is_args$args;
}
# all other short URLs
location / {
try_files $uri $uri/ /index.php$is_args$args;
}nginx설정 변경
sudo vi /etc/nginx/site-available/default
server {
    listen 80 default;    # 다른 파일을 만들어 쓰는 경우 default 삭제
    root /var/www/html;   # 라이믹스를 설치할 경로 (반드시 최상단에 위치해야 합니다.)
    server_name _;        # 사용할 도메인을 여기에 추가해도 됨 (예: server_name example.com www.example.com;)
    index index.html index.htm index.php;   # index.php가 반드시 포함되어 있어야 합니다.
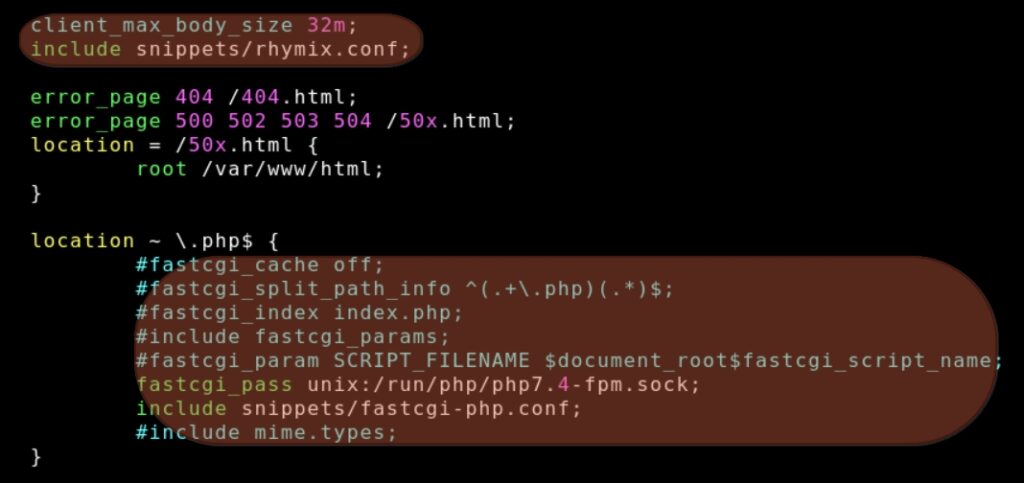
    client_max_body_size 32m;   # 업로드 허용 용량 (라이믹스는 분할 업로드를 지원하므로 약 10MB만 넘으면 사실상 무한[>

    include snippets/rhymix.conf;   # 라이믹스 rewrite 규칙 인클루드

    # location 구문을 사용하는 다른 설정은 반드시 라이믹스 rewrite 규칙보다 나중에 선언해야 합니다.
    location ~ \.php$ {
        fastcgi_pass unix:/run/php/php7.4-fpm.sock;    # PHP-FPM을 유닉스 소켓으로 연동하는 경우
    #   fastcgi_pass 127.0.0.1:9000;                   # PHP-FPM을 로컬 포트로 연동하는 경우
        include snippets/fastcgi-php.conf;
    }
}
이대로 바꿔야 하지만

ssl 설정도 있으니 다 바꾸지 말고 저 부분만 수정해서 저장
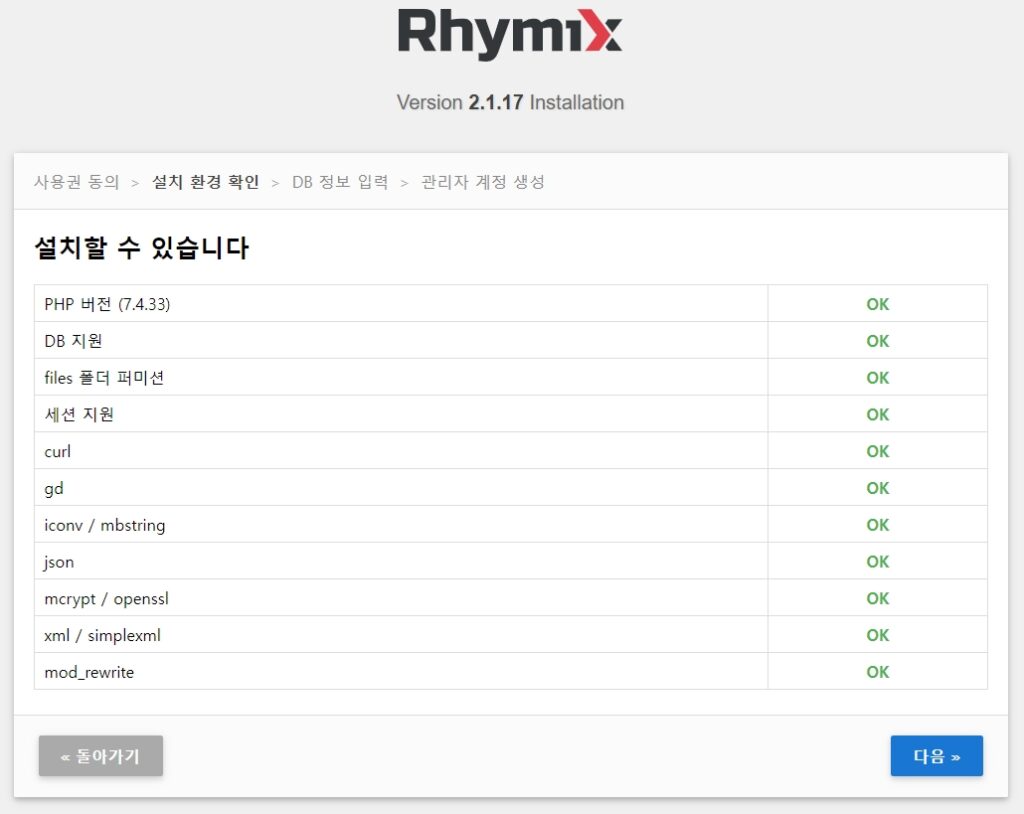
이제 도메인으로 접속하면 라이믹스 설치 환경 확인 가능

mod_rewrite까지 전부 OK됨
db 정보 입력하고 설치 마무리 하면 ssl까지 정상 작동하는 것 확인 가능
라이믹스 설치 후 아이피 변경시 접속 안되는 문제
#DB정보 변경
UPDATE rx_domains SET domain = 'to.com' WHERE domain = 'from.com';
서버 아이피를 변경하는 과정에서 도메인과 관련된 설정이 미리 처리되지 않은 경우 홈페이지 접속에 문제가 생길 수 있음
그런 경우 mysql을 실행하고 from.com을 이전 아이피로 하고 to.com을 변경된 아이피로 하여 DB 정보를 변경하면 해결됨
변경 후 설치폴더/files/cache 는 삭제해야 함.
nginx 리다이렉트 관련 설정
/etc/nginx/sites-available/default 파일 수정
#http: http -> https
server {
  listen 80;
  server_name example.com www.example.com
  return 301 https://$server_name$request_uri;
}

#https: www -> non-www
server {
  listen 443;
  server_name www.example.com;
  return 301 https://example.com$request_uri;

  ssl on;
  ssl_certificate /etc/nginx/ssl/webisfree/bundle-ssl.crt;
  ssl_certificate_key /etc/nginx/ssl/webisfree/my.key;
}